Mastering Vertical Video Editing: Our Workflow for Cinematic Reels
Hey there! We’re Night Owl Stories, and we’re excited to share how we create those eye-catching vertical videos for Instagram and other platforms. Today, we’re giving you a behind-the-scenes look at our workflow—the way we edit, organize, and bring everything together to make a cinematic one-minute reel. If you’re into video editing or just curious about how it’s done, this is for you!
1. Getting Organized
Before jumping into editing, we make sure everything’s neatly organized. Trust us, this makes life so much easier! For every project, we set up folders for:
Timelines
Screen recordings
Soundtracks
Resources
Camera clips (labeled A, B, etc.)
For this particular project, we had everything tucked into a folder named "Pixel 101," the series we’re working on. Having everything in place means we don’t waste time hunting for files.
Davinci Resolve's Media Pool
2. Setting Up in DaVinci Resolve
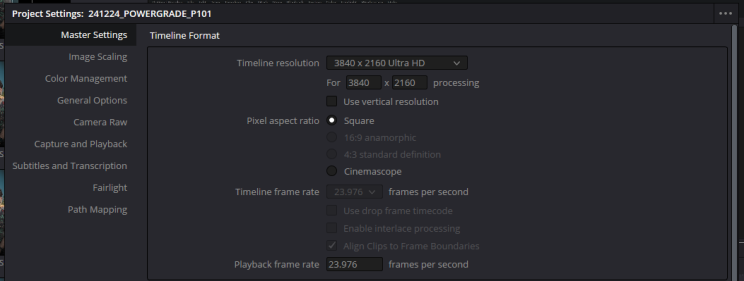
When it’s time to dive into DaVinci Resolve, we start by creating a new timeline and adjusting the settings to match the footage. For vertical videos, this means:
Resolution: 4K vertical
Frame rate: 23.976 fps
Subtitle and transcription language: English (for this project)
These settings ensure the final video looks crisp and works perfectly on Instagram.
Davinci Resolve Project Settings
3. Color-Coding Clips
Color Coding Clips for better organisation.
To keep things manageable, we color-code our clips. Here’s our system:
Lime Green: Clips with Aran speaking
Teal Blue: Clips with Joel speaking
Apricot: B-roll footage
It’s such a simple trick, but it saves us tons of time when editing.
4. Fixing Audio
Since we use lavalier microphones, audio often records on one channel. To fix this, we:
Fixing one-sided audio.
Adjust the clip attributes to stereo.
Map the channels so the audio plays evenly on both sides.
This step ensures the sound is balanced and smooth—no awkward one-sided audio here!
5. Using Transcriptions & Notion
One of our favorite tools in DaVinci Resolve is the transcription tool. It’s a game-changer! Here’s how we use it:
Transcribe audio to quickly find the best takes.
Match the transcription with our script in Notion.
Notion keeps us on track, and it’s easy to jump between Notion and Resolve to make sure everything lines up. It’s like having a roadmap for editing.
6. Basic Editing
Here’s where the fun begins:
Rough cuts: We arrange and trim clips to create the basic structure.
Refining: This is where we focus on tone and pacing.
Multiple takes: We always record with varying speeds and styles to keep things fresh and dynamic.
Davinci Resolve Timeline.
7. Color Grading
Color grading is one of our favorite parts. We use a Free Kodak 2383 Power Grade we developed to give our videos a consistent, cinematic feel.
With tools like the HDR and vector scopes, we tweak exposure, contrast, and saturation to perfection. Pro tip: Slightly underexposing can make footage look richer and moodier.
8. Music and Sound Effects
We pick our music from Artlist and make sure it complements the dialogue without overpowering it. Adding little sound effects like shutter clicks or focus beeps really brings the video to life. These small touches make a big difference.
Sound Design.
Using Titles & Subtitles to draw attention.
9. Adding B-Roll and Effects
B-roll is like the icing on the cake. If we’re talking about adjusting a tripod, we’ll include a close-up B-roll shot of the action. Effects like Gaussian blur can also help emphasize key moments or set a mood.
10. Subtitles and Zoom Effects
Subtitles are super important for vertical videos since many people watch without sound. We generate them using Resolve’s transcription tool and then tweak them for accuracy and readability. To keep things dynamic, we also use zoom effects to add subtle movement to clips.
11. The Final Touches
At the end, we:
Adjust audio with equalizers for cleaner sound.
Double-check the sequence for flow.
Export the video in a format optimized for Instagram.
Making It Faster
What used to take us 4-5 hours now takes about 2, thanks to this streamlined workflow. Tools like DaVinci Resolve and Notion really help us focus on the creative parts instead of getting bogged down in logistics.
Try It Yourself!
We hope this gave you some ideas to improve your own workflow. If you have questions about any of the tools or techniques we mentioned, let us know. We’re always happy to share more tips. Let’s keep creating amazing videos!


